Introduction
matrix-media-repo (aka MMR) is a highly customizable multi-domain media repository for Matrix. Intended for medium to large deployments, this media repo de-duplicates media while being fully compliant with the Matrix specification.
Smaller/individual homeservers can still use this project, though it may be difficult to set up or have higher than expected resource consumption. If you're looking for an S3 connector, please consider using synapse-s3-storage-provider instead.
Support
Community help and support is available at #mediarepo:t2bot.io.
Installing
MMR can be installed using Docker or the official binaries. Compiling it yourself is an option, though not typically recommended.
Requirements
The depolyment requirements vary depending on which environment you're deploying for (see "intended environments"), however some general guidelines are:
- A modern processor with some cores available (a
t2.smallort2.mediumwill generally be fine). - A sizable disk or access to an S3-like service. The size depends on intended use cases.
- 1-2GB of memory, depending on configuration and usage.
Intended environments
MMR is intended for high-traffic environments. Typically, these will be either large servers or hosting providers where pooling media resources is ideal. Smaller homeservers can use MMR as well, though they won't usually get the same benefits as larger deployments.
Small/individual server owners should consider using their homeserver's built-in media repo instead. Deploying MMR can be complicated, and support rooms will assume basic fundamental knowledge of reverse proxies and Matrix when diagnosing problems.
Medium/large individual server
Homeservers which have more than 1000 Monthly Active Users (MAU) or which see an upload rate of a steady 0.5Hz will fit this category. Other metrics to consider are how many rooms the server is in and how much media is being shared in those rooms. For example, a homeserver may only have a few users on it and a few uploads an hour, but might partcipate in rooms which share gigabytes worth of media every day - those servers might still see a benefit of using this project.
For this deployment, servers will need a reverse proxy which can route media requests to MMR, leaving the other Matrix requests going to the homeserver. More information on this setup can be found in the "Reverse Proxy Setup" section of this documentation.
Resource requirements
In this setup it is usually expected that either the Docker image or binaries will be used alongside the process running the homeserver itself. For instance, if you're using Synapse then usually MMR will be running on the same host alongside Synapse.
Normally the system specifications for your homeserver will have enough overhead to also run an MMR instance.
For clarity though: the CPU requirements are usually minimal (1-2 cores), and the memory usage can be calculated per the configuration section of this documentation. The disk requirements can be mitigated using S3 or an S3-like service, or by referencing the configuration section of this documentation.
Multiple servers
When several servers are being operated by the same entity, it can be beneficial to use a media repo which de-duplicates across all the available hosts. For example, an organization which has departmental homeservers will generally have a single media repo deployment which serves media for all of the homeservers in the organization.
An architecture diagram for this style of deployment would be:
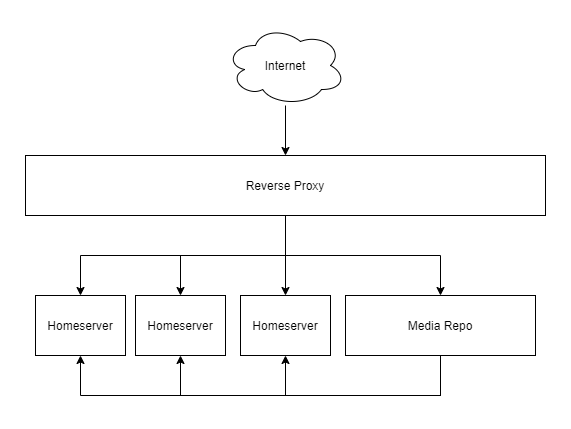
Note that MMR will still make requests to the homeserver, and thus will need appropriate access to them.
Resource requirements
Deployments taking this shape usually rely on Docker or binaries on a dedicated host near the homeserver instances.
Much like medium/large deployments, the CPU requirements are minimal (1-2 cores should be fine), and the memory requirements can be calculated by referencing the configuration section of this documentation. Disk space requirements can be mitigated with S3 or an S3-like service, or by referencing the configuration section of this documentation.
Hosting providers
Hosting providers offering homeservers of any size can make use of MMR to lower costs associated with hosting media, and to manage/report usage of the media repository.
MMR can scale horizontally to cover thousands of servers on one logical media repo. See the "Deployment" section for more information on how to configure this setup.
A legacy architecture is to put a few hundred servers onto a single MMR instance, as MMR previously could not horizontally scale. A Redis layer was shared across all the MMR instances to supply a datacenter-wide cache without having to put thousands of servers onto that media repo. Documentation for this setup is available here.
Resource requirements
Generally it is expected that hosting providers will use Docker as an installation method. CPU requirements are generally low (4-6 cores for about 500 hosts), however disk space and memory can be significant across all deployed instances.
To help keep individual processes working efficiently, it is recommended to deploy approximately 1 MMR instance per 500 possible hosts.
Disk space is strongly recommended to be managed with S3 or an S3-like service. Mounting a volume is possible, though usually datacenter deployments prefer to have zero ties to physical disks.
Installation methods
MMR can be installed using Docker or the official binaries. Compiling it yourself is an option, though not typically recommended.
Docker
After preparing a configuration file at /etc/matrix-media-repo/media-repo.yaml (see
configuration section of this documentation), something similar to the following can be run:
docker run \
    --rm -it \
    -p 127.0.0.1:8000:8000 \
    -v /etc/matrix-media-repo:/data \
    turt2live/matrix-media-repo:v1.3.0
A list of available tags can be found on Docker Hub.
Note: Using latest is not recommended. Please use a tagged version instead.
Downloads
The latest official builds of the media repo's binaries can be found on GitHub. Download the one for your platform or compile your own.
After preparing a configuration file at /etc/matrix-media-repo/media-repo.yaml (see configuration
section of this documentation), something similar to the following can be run:
./media_repo -config /etc/matrix-media-repo/media-repo.yaml
Linux
Note that on Linux you may need to install libde265-dev and libheif-dev before MMR will
start.
Compilation
Go 1.20 is required to compile the media repo.
Note: The master branch of the media repo is potentially unstable! Be sure to check out a
tagged release for safety.
The following can be run to compile your own binaries for matrix-media-repo:
git clone https://github.com/t2bot/matrix-media-repo.git
cd matrix-media-repo
./build.sh
Once built, there should be binaries in ./bin ready for deployment.
To use the binaries, follow the instructions for running the downloaded binaries.
Windows users
./build.sh won't work out of the box for you, likely complaining about pkg-config not being found.
To fix this, follow the pkg-config setup instructions here
and run the following:
git clone https://github.com/Microsoft/vcpkg.git
cd vcpkg
.\bootstrap-vcpkg.bat
.\vcpkg integrate install
.\vcpkg install libde265:x64-windows libde265:x86-windows
.\vcpkg install libheif:x64-windows libheif:x86-windows
You may need to update your PKG_CONFIG_PATH to include .\installed\x64-windows\lib\pkgconfig
and .\installed\x86-windows\lib\pkgconfig from the vcpkg checkout.
You may also need to update your PATH to include .\installed\x64-windows\bin and
.\installed\x86-windows\bin, again from the vcpkg checkout.
After that's all set up, reopen your terminal and run the build steps again.
Linux users
You will need libde265-dev and libheif-dev installed.
Deployment
MMR must run behind a reverse proxy in order to support SSL/TLS - it does not have configuration options for enabling this on its own.
The reverse proxy must pass through the Host header to MMR such that it matches
a domain specified in the config. For example, if your homeserver's name is example.org, then
MMR must receive Host: example.org regardless of how the request got to the reverse
proxy.
An example scenario where the Host header can change is in server delegation (common in
hosting providers): the Host the reverse proxy is approached with might not match the server
name and thus will need to manually rewrite the Host header being proxied to MMR.
Other proxy headers, like X-Forwarded-For, are recommended to be sent to MMR for
identification in the logs. In the specific case of X-Forwarded-For, for any requests MMR
needs to make to the homeserver it will do so with the X-Forwarded-For header applied to
help ensure that the user's IP history doesn't reveal MMR's IP address.
Cache headers and other response headers should be left managed by MMR and not
intercepted or changed by the reverse proxy (except Server, that can be safely overwritten).
Example: nginx
Configuring nginx to proxy your homeserver alongside the media repo is fairly simple with
just a few proxy directives. Assuming your client and federation APIs are handled by the
same server block, the following can be used as a reference:
server {
  listen 443 ssl;
  listen [::]:443 ssl;

  # SSL options not shown - ensure the certificates are valid for your
  # homeserver deployment.

  # Redirect all traffic by default to the homeserver
  location /_matrix {
      proxy_read_timeout 60s;
      proxy_set_header Host $host;
      proxy_set_header X-Real-IP $remote_addr;
      proxy_set_header X-Forwarded-For $remote_addr;
      proxy_pass http://localhost:8008; # Point this towards your homeserver
  }

  # Redirect all media endpoints to the media-repo
  location /_matrix/media {
      proxy_read_timeout 60s;

      # Make sure this matches your homeserver in media-repo.yaml
      # You may have to manually specify it if using delegation or the
      # incoming Host doesn't match.
      proxy_set_header Host $host;

      proxy_set_header X-Real-IP $remote_addr;
      proxy_set_header X-Forwarded-For $remote_addr;
      proxy_pass http://localhost:8000; # Point this towards media-repo
  }
}
Horizontal scaling
MMR's horizontal scaling is achieved through the MACHINE_ID environment variable. The default
machine ID is 0, and is responsible for running background tasks. Each deployed process must
have a unique machine ID, otherwise upload conflict can occur. MACHINE_ID is a number between
0 and 1023.
The MMR processes communicate with each other over Redis. All deployed MMR instances must use the same configuration files, Redis servers, and database. Once running, traffic can be routed in whatever way makes sense for your use-case. For example, routing admin APIs to machine 0, uploads to machines 1-10, downloads and thumbnails to 11-20, and everything else to 21-25.
It is typically recommended to at least move URL previews (/_matrix/media/.*/preview_url) to
dedicated MMR instances. URL previews tend to have high traffic and short request times, leading
to resource consumption.
Thumbnails can additionally cause higher than average memory spikes due to image manipulation. Moving thumbnails to dedicated instances is recommended.
As a general rule of thumb, for every 500 homeservers in a datacenter there should be 1 MMR instance. For example, if you have 1736 servers then there should be 4 MMR instances (3.472 rounded up).
If using file datastores, the directories must be kept in sync for all MMR instances. For example, if the logical MMR cluster is spread over 5 boxes, all 5 boxes will need to have the exact same directory contents. For this reason, it is strongly recommended to exclusively use S3 datastores when using horizontal scaling.
Upgrades & high availability
Typically in an environment where horizontal scaling is used there's also a desire for zero downtime. Typically, uploading large fleets of processes can be a challenge if uptime is a concern.
Starting with v1.3.0, MMR can run side-by-side with different versions of itself, enabling rolling upgrades and high availability infrastructure.
For a given version number X.Y.Z, the following applies:
- A change in
Xindicates a breaking change to MMR. The entire cluster should be brought offline to perform the upgrade. Check the upgrade notes for further guidance on zero-downtime upgrades to this version. - A change in
Yindicates a large but backwards compatible change to MMR. The cluster should be upgraded quickly, but does not need to be taken offline first. - A change in
Zindicates a patch or otherwise small backwards compatible change to MMR. The cluster can be upgraded more slowly, and does not need to be taken offline first.
In all cases, ensure machine ID 0 is upgraded & restarted first. The remaining machines
can be upgraded/restarted in any order.
Upgrading
Upgrading MMR is usually fairly easy: stop the existing process, replace the binaries/Docker image, and start it back up again.
Some versions require mandatory configuration changes, or have other restrictions preventing such an easy upgrade. Check the notes in this section when upgrading to a listed version.
A rolling changelog for MMR is available here.
Upgrading to v1.3.0
Mandatory Configuration Change
Datastores are no longer managed by matrix-media-repo internally, meaning you MUST specify a datastore ID on each of your configured datastores. If you're setting up matrix-media-repo for the first time then you can use whatever you want for a datastore ID (though it's recommended to stick to alphanumeric strings). If you're upgrading to this version however, you will need to pull the datastore IDs out of the matrix-media-repo and add them to your configuration.
For safety, the datastores table is not deleted from the database in this upgrade. A future version may drop the table, however.
Getting existing datastore IDs
Before upgrading, you can get your datastore IDs fairly easily. The best way might be to look at the startup log of your media repo:
INFO[2023-05-21 20:58:45.116 Z] Datastores:
INFO[2023-05-21 20:58:45.116 Z]         file (e9ce13bbb062383ce1bcee76414058668877f2d51635810652335374336): /mnt/mmr-store/location4
INFO[2023-05-21 20:58:45.117 Z]         s3 (7669e2fb8ccaa0801e4255a417ad20884f76b8611659655069202644992): s3://redacted.r2.cloudflarestorage.com/redacted
This way, you're able to correlate locations to IDs. For example, the file datastore configured to put media at
/mnt/mmr-store/location4 has ID e9ce13bbb062383ce1bcee76414058668877f2d51635810652335374336. Add this as
id: "e9ce13bbb062383ce1bcee76414058668877f2d51635810652335374336" in your media repo config file.
Alternatively, you can use the admin API to get your datastores:
curl -s -X GET -H "Authorization: Bearer YOUR_ACCESS_TOKEN" https://example.org/_matrix/media/unstable/admin/datastores
{
  "e9ce13bbb062383ce1bcee76414058668877f2d51635810652335374336": {
    "type": "file",
    "uri": "/mnt/mmr-store/location4"
  },
  "7669e2fb8ccaa0801e4255a417ad20884f76b8611659655069202644992": {
    "type": "s3",
    "uri": "s3://redacted.r2.cloudflarestorage.com/redacted"
  }
}
The returned object is keyed by ID over the API.
In either case, take the ID and add it to the associated datastore in your config, similar to the following:
# Your specific configuration may be different
datastores:
  - type: file
    id: "e9ce13bbb062383ce1bcee76414058668877f2d51635810652335374336"  ## ADD THIS
    #enabled: true   ## REMOVE THIS - use `forKinds: []` to disable a datastore
    forKinds: ["archives"]
    opts:
      path: "/mnt/mmr-store/location4"
  - type: s3
    id: "7669e2fb8ccaa0801e4255a417ad20884f76b8611659655069202644992"  ## ADD THIS
    #enabled: true   ## REMOVE THIS - use `forKinds: []` to disable a datastore
    forKinds: ["all"]
    opts:
      ssl: true
      tempPath: "/mnt/mmr-store/s3-staging"
      endpoint: sfo2.digitaloceanspaces.com
      accessKeyId: "redacted"
      accessSecret: "redacted"
      bucketName: "redacted"
Note: If matrix-media-repo detects that a datastore ID is used but not referenced in the config then it will refuse to start.
This new configuration style additionally allows for out-of-band datastore transfers. If you move all your data to a new path/server, for example, then you can simply update the path in the config for that datastore.
Configuration
The media repo has a fairly extensive configuration structure with support for live reloading, split configs, per-domain configs, and fine-grained control over individual features. This section covers the minimum for configuring a media repo and does not cover feature-specific areas of the config: those are left for other areas of this documentation.
The sample configuration can be found on GitHub.
Basic configuration
The following is the minimum required information to make use of MMR:
repo:
    # Generally the bind address should be local as MMR should be behind a
    # reverse proxy. If using Docker, set this to `0.0.0.0`.
    bindAddress: '127.0.0.1'
    port: 8000
database:
    # Currently only PostgreSQL is supported. This is *not* the same as your
    # homeserver's database.
    postgres: "postgres://your_username:your_password@localhost/database_name?sslmode=require"
homeservers:
    - name: example.org
      csApi: "https://example.org"
admins:
    - "@your_username:example.org"
datastores:
    - type: file
      id: "my_file_datastore"
      forKinds: ["all"]
      opts:
        path: /data/media
For the homeservers, it's important to ensure that your server is correctly represented. The name
must be the server name as it appears in your user ID. As mentioned in the deployment documentation,
this will be what the media repo expects as a Host header too. The csApi is the URL for where the
media repo can reach the homeserver for some tasks. Usually this will be the same URL used to
configure Matrix clients, though it can be internally routed if needed.
At least one datastore needs to be supplied and enabled. More information about the datastores can be found in a later section.
Datastores
Datastores are where the media repo puts content for later usage. All uploads, thumbnails, remote media, URL preview images, etc are stored in a datastore and recorded in the database. On most deployments these datastores can get to be hundreds of gigabytes in size, with the largest deployments seeing in excess of 10TB worth of data, even with de-duplication offered by the media repo.
The two main supported datastores are currently file and s3.
Each datastore can have a number of "kinds" associated with it to ensure that specific types of
content gets put in that location. The media repo de-duplicates across all datastores, and the first
encounter for a piece of content will determine which datastore it ends up in. The kinds are specified
through the forKinds option in the config, which can have the following values:
all- The datastore can handle all of the following kinds of content.thumbnails- The datastore will be responsible for handling thumbnails.local_media- The datastore will house uploads from users on the configured homeservers.remote_media- The datastore will contain content from other homeservers.archives- The datastore will handle archives (see the GDPR section for more information).
When multiple datastores are available for a certain kind of media, the media repo will pick the datastore with the smallest size first to try and balance them out. It is recommended to have a single datastore be responsible for a single kind of media.
It is valid to have a datastore responsible for no kinds of media for cold storage purposes. See "datastore management" in this documentation for more information.
File-based
File-based datastores use a directory on the host running the media repo to house content. These kinds of datastores are usually best for temporary storage or for frequently requested content. In Docker environments, it is highly not advised to use this datastore type due to the requirement of having to map volumes, which many use cases for the media repo Docker image will find impossible or unmanagable.
When using a file-based datastore, it is recommended to use higher performance disks due to frequent reads and writes.
The configuration for a file-based datastore is as follows:
datastores:
  - type: file
    id: "my_file_datastore"
    forKinds: ["all"]
    opts:
      path: /var/matrix/media
The path is simply where the media will be placed. If the path changes, be sure to keep the
id the same so MMR knows where to access it.
S3
The S3 datastore is the most recommended datastore method as it allows for large amounts of data to be stored without having to tie the host down to particular disks.
Currently the datastore is tested and validated to work with the following S3-like providers:
- Amazon AWS S3
- DigitalOcean Spaces
- MinIO
- Scaleway
A configuration for an S3 datastore would be:
datastores:
  - type: s3
    id: "my_s3_datastore"
    forKinds: ["all"]
    opts:
      tempPath: "/tmp/mediarepo_s3_upload"
      endpoint: sfo2.digitaloceanspaces.com
      accessKeyId: ""
      accessSecret: ""
      ssl: true
      bucketName: "your-media-bucket"
      region: "sfo2"
Normally, the region is not needed and can be commented out for most providers. Some providers, like
Scaleway, require a region to be set, however.
The tempPath is to reduce memory usage in the media repo: the underlying library used for S3
handling causes large memory usage for small files when the size is unknown, so the media repo dumps
the file to disk to get an accurate reading on the file size before sending it to S3. If memory usage
isn't a concern, set tempPath to an empty string. When using Docker it is acceptable (and
recommended) to leave this within the container - it does not need a volume to be mapped.
The remaining settings should all be supplied by the S3 provider, though the names of things might be
slightly different. For example, accessKeyId might just be an "access key" or simply "key ID".
Supported providers
MMR is validated to work with the following S3 providers. Others may work, however support is limited for anything not listed below.
Split configs/per-domain
The media repo can be pointed to a directory with several configuration files in it to allow for split configurations. This is useful as a layering mechanism as well as being able to supply per-domain configs in more complicated environments.
The configuration directory can be specified using -config /path/to/config/dir for the binaries
and through the REPO_CONFIG environment variable in Docker. All files will be automatically watched
for changes to live-reload them.
Structure
Configuration directories are shallow and do not recurse - put all your files in a single directory and do not nest them into further directories. The order the files are read is alphabetical, and so it is recommended to prefix the files with a number for predictable ordering.
Files override each other unless they are indicated as a per-domain config (see below). The media repo will always start with a default configuration then apply all the configuration files one by one over top of that, leading to the final configuration it will use.
Per-domain configs
Per-domain configs allow for more fine-tuned control over options for each individual homeserver. Usually this will be most utilized by hosting providers which offer product packages for fewer restrictions or more features.
When using per-domain configs, the homeservers field of the main config can be safely ignored -
the media repo will determine what needs to be there based on the per-domain configs it sees.
A per-domain config must have a homeserver field set to identify it as different from the main
config. An example minimal configuration would be:
homeserver: example.org
csApi: "https://example.org"
backoffAt: 10
adminApiKind: "matrix"
Note that csApi, backoffAt, and adminApiKind are all the same options that would be found
in the homeservers field of the main config.
Any option not in the following list can be specified in the per-domain config to change the setting for just that domain:
homeservers- because why would you.database- because the database is for the whole process.repo- because the listener configuration is for the whole process.sharedSecretAuth- because the option doesn't apply to a particular domain.rateLimit- because this configuration is applied before the host is known.metrics- because this affects the whole process.admins- because admins are repo-wide.downloads.cache- because the cache is repo-wide.downloads.numWorkers- because workers are configured repo-wide.urlPreviews.numWorkers- because workers are configured repo-wide.thumbnails.numWorkers- because workers are configured repo-wide.federation- because the federation options are repo-wide.downloads.expireAfterDays- because remote media downloads are not for any particular domain.thumbnails.expireAfterDays- because thumbnails aren't associated with any particular domain.urlPreviews.expireAfterDays- because previews aren't associated with any particular domain.redis- because the cache is repo-wide.
An example configuration structure could be:
01-main.yaml:
repo:
    bindAddress: 127.0.0.1
    port: 8000
identicons:
    enabled: false
# ... and other options
example.org.yaml:
homeserver: example.org
identicons:
    enabled: true
In this example, the default for all homeservers is to have identicons disabled while for
example.org they will be enabled.
Calculating memory requirements
Memory can be difficult to calculate or predict for the media repo due to the number of things it does. For most deployments, starting with 1-2GB and adjusting as needed will get a good idea for how much memory will be used.
A formula to get the approximate memory usage would be:
75mb
+ (thumbnails.maxSourceBytes * 2)
Calculating storage requirements
Regardless of the datastore chosen, the content will take up space. The actual number can be hard to calculate due to fluctations in usage patterns and a number of unknowns, however this section should give some general guidance on where to start planning.
The first thing to determine is the kind of media most users on your server will be uploading and/or consuming. Screenshots tend to be in the 500kb - 1mb range while photos tend to be 4-12mb. Avatars for users tend to be either photos or highly cropped images under 1mb in size.
Once the kind of media is determined, the next step is to figure out a frequency: most communities will be surrounded by sharing some photos in a week and many screenshots a day. Taking the frequency and multiplying it by the average anticipated file size from the previous step will result in an optimistic number for storage requirements. Multiplying that number by two will get a pessimistic estimate.
A typical user will encounter 10-20mb worth of new media each day. Assuming most of this can be de-duplicated or cached, the following estimations can be made:
| Monthly active users | Raw storage per month | De-duplicated storage per month |
|---|---|---|
| <500 | 150 - 300 GB | 60 - 120 GB |
| 2000 | 600 - 1200 GB | 240 - 480 GB |
| 5000 | 1.5 - 3 TB | 0.6 - 1.2 TB |
| 10,000 | 3 - 6 TB | 1.2 - 2.4 TB |
| 120,000 | 36 - 72 TB | 14.4 - 28.8 TB |
Note: Exact growth is something you'll have to monitor for and manage. This is provided as a guide only for the purposes of getting started with the media repo.
General configuration
Most major features of the media repo have their own dedicated sections, however some are generic enough to be placed here.
Logging
The media repo will always output to stdout regardless of configuration settings. For Docker this means the built-in Docker logging can be relied upon.
The media repo can also output to a file that rotates daily and keeps the last 14 days. Here's the configuration for that:
repo:
    logDirectory: "./logs"
By specifying "-" (including quotes) as the logDirectory, the media repo will only output to
stdout.
Forwarded addresses
Some environments need to control how the X-Forwarded-* headers are handled by the media repo. By
default, the media repo validates and expects an X-Forwarded-For and X-Forwarded-Host header from
the reverse proxy, though this can be disabled with the options below.
Configuration:
repo:
    trustAnyForwardedAddress: false
    useForwardedHost: true
To disable all handling of X-Forwarded-Host, set useForwardedHost to false. Note this might be
required when using the Kubernetes nginx ingress controller, per issue #202.
To disable validation of the X-Forwarded-For header, accepting the value verbatim, set
trustAnyForwardedAddress to true. This is typically useful in scenarios where the clients being
proxied are on a private network which the media repo might ignore as potentially invalid.
Federation
The media repo does federated API calls to get remote media, though doesn't have many options to configure this behaviour. In general, to control outbound federation on the media repo, use a custom DNS server or prevent inputs to the media repo that would cause outbound federation.
Configuration:
federation:
    backoffAt: 20
The backoffAt setting controls how many consecutive failures it takes for the media repo to stop
calling the homeserver for a short time. Note that 404 errors are not considered a failure.
Database pool
For most environments the default connection pool will be okay, however larger deployments may wish to change the database pool size. The configuration for that is as follows:
database:
    pool:
        maxConnections: 25
        maxIdleConnections: 5
The maxConnections limits the media repo's total connections, while maxIdleConnections is the
maximum number of connections it'll hold open when it isn't doing anything.
Timeouts
The media repo has various configurable timeouts which can be specified in the config:
timeouts:
    urlPreviewTimeoutSeconds: 10
    federationTimeoutSeconds: 120
    clientServerTimeoutSeconds: 30
Each is the maximum amount of time the media repo should spend waiting for resources to be fetched. Note that federation is primarily used to download media.
Uploads
Uploads for the media repo get processed through a number of stages, which include buffering them into memory for processing. This can cause high memory usage if not carefully managed.
The configuration for uploads is:
uploads:
    maxBytes: 104857600 # 100MB default, 0 to disable
    reportedMaxBytes: 104857600
    minBytes: 100
The maxBytes control the maximum size being uploaded, with zero disabling the limitation (not
recommended). reportedMaxBytes, if supplied, will be used to inform the user of the maximum file
size they can upload. Typically the reportedMaxBytes option is not needed outside of rare
circumstances. When reportedMaxBytes is zero (the default), it'll use maxBytes. When it is -1,
it will indicate that there is no limit to users.
minBytes is a minimum size users must upload for the media repo to make it worthwhile processing
the upload. The media repo has to spend time and energy processing and storing each file, and small
files often cost more to process/store than it is worth. 100 bytes (the default) is an approximate
break-even point for balancing cost vs minimum file size.
Reverse proxies
Often reverse proxies will impose maximum client request sizes which may be different from the maximum allowable bytes in your config. Check your reverse proxy's configuration to ensure that it will not be imposing an artificially small limit on your users.
If your environment is intentionally set up to disallow large file uploads from your users, but have
a higher limit internal to your network, use the reportedMaxBytes option to report the reverse
proxy's limit.
Downloads (remote media)
Remote media is any media offered by a homeserver that isn't controlled by the media repo
instance. For example, if your media repo config lists hs1.example.org and hs2.example.org,
then other-hs.example.org will be considered remote.
The following configuration can be used to control remote media downloads:
downloads:
  maxBytes: 104857600 # 100MB default, 0 to disable
  numWorkers: 10
  failureCacheMinutes: 5
  expireAfterDays: 0
The maxBytes value ensures that large remote media is not fetched. Normally this is set to the
same value as your upload limit for consistency.
numWorkers is the number of concurrent requests for external media to handle at a time. The media
repo already de-duplicates requests for the same media, though requests spanning multiple servers
or media IDs can still be made. Requests are queued if they cannot be processed concurrently. It
is recommended to increase this if you're having troubles downloading remote media, or if you're
having issues with memory usage.
Sometimes servers fail to respond (500 errors, offline, etc) and the media repo will cache failures
for a short while on particular media to give the remote server some breathing room. This breathing
room can be changed with failureCacheMinutes.
Remote media is often not used after a week or two of being downloaded, and can be purged with the
expireAfterDays option. If a client re-requests the media, it will be downloaded again.
Thumbnails
Thumbnails are requested by most clients to ensure that things like images can be shown at a smaller size than the full media. Thumbnails have a large memory and CPU requirement and are the most requested resource of the media repo.
The full configuration for thumbnails is:
thumbnails:
  maxSourceBytes: 10485760 # 10MB default, 0 to disable
  numWorkers: 100
  expireAfterDays: 0
  sizes:
    - width: 32
      height: 32
    - width: 96
      height: 96
    - width: 320
      height: 240
    - width: 640
      height: 480
    - width: 800
      height: 600
  dynamicSizing: false
  allowAnimated: true
  defaultAnimated: false
  maxAnimateSizeBytes: 10485760 # 10MB default, 0 to disable
  stillFrame: 0.5
  types:
    - "image/jpeg"
    - "image/jpg"
    - "image/png"
    - "image/gif"
    - "image/heif"
    - "image/webp"
    #- "image/jxl" # Be sure to have ImageMagick installed to thumbnail JPEG XL files
    #- "image/svg+xml" # Be sure to have ImageMagick installed to thumbnail SVG files
Many of these options are described in later sections.
maxSourceBytes controls how big of media is allowed to be thumbnailed. Typically the memory
usage for a thumbnail will be at worse 1.5x this value, multipled by numWorkers (the number of
thumbnails to generate concurrently). To avoid exhausting the server of memory, it is recommended to
keep this at roughly 1/10th the maximum upload size, though specific use cases may call for less or
more.
numWorkers, as mentioned, is the number of concurrent thumbnails to process. The media repo will
queue up thumbnails which need to be generated, though with thumbnails being the most highly requested
resource it is important to ensure there is enough room to process those thumbnails. Once a thumbnail
is generated, it is stored in the media repo so it does not need to be re-generated again.
Approximately 2 weeks after a thumbnail has been generated, clients are unlikely to request a
thumbnail again. To save space, expireAfterDays can be set to clean up thumbnails which have been
previously generated. If a client re-requests a thumbnail, it will be regenerated.
Thumbnail sizes & dynamic sizing
The sizes control which buckets to fit thumbnails into. The Matrix specification allows the media
repo to return a larger thumbnail than the client requested, or a maximum size if no larger size
is available. As such, the media repo will return a thumbnail exactly matching one of these sizes
depending on the request from the client. The most common size requests are shown above.
For more pixel-perfect thumbnails that aren't potentially blurry in clients, set dynamicSizing: true
to ignore the sizes list and instead generate a thumbnail for the exact size the client requested.
This will lead to significantly more thumbnails being generated, which means higher storage
requirements and higher resource requirements (typically).
Animated thumbnails
Thumbnails by default are static images which are resized and cropped to the appropriate dimensions. Some image formats, like GIFs, can sometimes be better as animated thumbnails instead of a static image.
For non-animated thumbnails on animated file types (like GIFs), the stillFrame option chooses where
in the file's duration to generate a thumbnail from. By default this is 0.5 to use an image from the
middle in order to handle GIFs which would appear as a transparent frame if picked from the start.
Animated thumbnails can be entirely turned off using allowAnimated, forcing the media repo to use
the stillFrame option for all animated media types.
Animated thumbnails can be requested by clients, though many do not support this custom flag on the
media repo. To change the behaviour to turn on animations by default, set defaultAnimated: true.
Animated thumbnails can be much more resource intensive to handle than regular thumbnails, and as
such the source material can be limited with maxAnimateSizeBytes. This option only applies when
the media repo is generating an animated thumbnail. It is recommended to keep this value fairly
small to avoid letting resource usage exceed expectations.
Thumbnail types
The types controls which mimetypes of media the media repo should try to thumbnail. The media
repo supports the mimetypes listed in the sample config, with more being possible in the future.
Note: image/svg+xml requires ImageMagick to be available
to the media repo. The Docker image contains the appropriate binaries for this to happen.
Identicons
Identicons are generated avatars for a given hash. Some legacy clients use this endpoint to supply a default avatar to users, though it is not very common.
There is only one option for identicons - whether or not to use them:
identicons:
    enabled: true
The resource requirements for having identicons enabled are minimal. An example of an identicon for "matrix-bot" is:

URL previews
Clients looking to assist users by showing the contents of a URL will often rely on the server to generate a preview to avoid exposing the user's IP to the service. The media repo can have URL previews disabled (usually resulting in previews not being shown to users), though it is recommended to have them enabled for the best user experience.
The media repo uses OpenGraph and its own built-in page scraping to generate previews, though other methods can be enabled (see later documentation).
The configuration for URL previews is as follows:
urlPreviews:
  enabled: true
  numWorkers: 10
  maxPageSizeBytes: 10485760 # 10MB default, 0 to disable
  filePreviewTypes:
    - "image/*"
  defaultLanguage: "en-US,en"
  numWords: 50
  maxLength: 200
  numTitleWords: 30
  maxTitleLength: 150
  expireAfterDays: 0
Like downloads and thumbnails, URL previews have a worker system to process multiple concurrent
requests for previews. The number of active workers can be controlled with numWorkers. By default
this is 10, though larger deployments may wish to consider setting this to a number in the hundreds
to ensure there is enough availability to process previews quickly.
Also like thumbnails, URL previews can have a significant drain on resources. To help minimize the
impact, change maxPageSizeBytes to limit how much of a page the media repo will try and preview.
The filePreviewTypes are the mimetypes the media repo will try to thumbnail if it encounters them
during the preview generation process. This is usually thumbnailed and shown alongside the other
information in the preview.
defaultLanguage can be used as teh default language to send to the remote server when the client
doesn't send an Accept-Language header to the media repo.
Previews are limited by a number of words first, then limited to a number of characters (which may
involve taking a few words off the end). This is to try and give a sensible preview of what the
page describes without generating previews with a large amount of text. The title for the preview
can be controlled with numTitleWords and maxTitleLength whereas the description (body) can be
controlled with numWords and maxLength.
URL previews are often not used after a couple days and can be safely purged with expireAfterDays.
If a client re-requests a preview, it will be regenerated.
Security
URL previews can expose internal parts of your network to outsiders with specially formatted requests. To avoid leaking data about your infrastructure, it is incredibly important to ensure the allowable networks are configured:
urlPreviews:
  previewUnsafeCertificates: false
  disallowedNetworks:
    - "127.0.0.1/8"
    - "10.0.0.0/8"
    - "172.16.0.0/12"
    - "192.168.0.0/16"
    - "100.64.0.0/10"
    - "169.254.0.0/16"
    - '::1/128'
    - 'fe80::/64'
    - 'fc00::/7'
  allowedNetworks:
    - "0.0.0.0/0"
One or both of disallowedNetworks and allowedNetworks must be supplied, otherwise the media
repo will refuse to generate previews. Both options are list of CIDR ranges.
The media repo will first check allowedNetworks to see if the network is allowable. By default
this is as shown above (0.0.0.0/0) to allow all networks to be previewed and limited by the
disallowed networks list.
If a network is allowed by the allowedNetworks, the media repo will then check against the
disallowedNetworks list to ensure the request is still safe to go through to previewing. This
is usually where private networks are specified, like in the example.
In some rare circumstances, the certificates of the sites being previewed might not be traditionally
signed or secure. If this is the case for your environment, set previewUnsafeCertificates: true
to disable certificate checks on previews.
oEmbed
oEmbed is another form of previewing a URL which requires talking to a provider. By default the media repo has oEmbed previews disabled for privacy concerns, however this can be changed with the following configuration:
urlPreviews:
  oEmbed: true
The media repo ships with oEmbed's official providers list
bundled in and will use that if an alternative providers.json is not specified. The
providers.json is considered an "asset" for the media repo, and can be changed by specifying an
asset path as a command line flag.
Cache
The media repo caches media for faster access on frequently requested media. Only one cache mechanism can be used at a time.
Redis
Redis can be used as a high-performance cache for the media repo, allowing for (in future) multiple media repositories to run concurrently in limited jobs (such as some processes handling uploads, others downloads, etc). Currently though, it is capable of speeding up deployments of disjointed media repos or in preparation for proper load balancer support by the media repo.
The media repo connects to a number of "shards" (Redis processes) to distribute cached keys over them. Each shard is not expected to store persistent data and should be tolerant of total failure - the media repo assumes that the shards will be dedicated to caching and thus will not have any expectations that a particular shard will remain running.
Setting up a shard is fairly simple: it's the same as deploying Redis itself. The media repo does not manage the expiration policy for the shards, so it is recommended to give the Redis docs a read to pick the best eviction policy for your environment. The current recommendations are:
- A
maxmemoryof at least1gbfor each shard. - A
maxmemory-policyofallkeys-lfuto ensure that the cache gets cleared out (the media repo does not set an expiration time or TTL). Note: anlrumode is not recommended as the media repo will be caching all uploads it sees, which includes remote media. Alfumode ensures that recent items being cached can still be evicted if not commonly requested. - 1 shard for most deployments. Larger repos (or connecting many media repos to the same shards) should consider 3 or more shards.
The shards in the ring can be changed at runtime by updating the config and ensuring the media repo has reloaded the config. Note that changing cache mechanisms at runtime is not recommended, and a full restart is recommended instead.
Note: Metrics reported for cache size will be inaccurate. Frequencies of requests will still be reported.
Note: Quarantined media will still be stored in the cache. This is considered a bug and will need fixing.
Connecting multiple disjointed media repos (hosting providers)
Though the media repo expects to be the sole and only thing in the datacenter handling media, it is not always possible or sane to do so. Examples including hosting providers which may have several media repos handling a small subset of domains each. In these scenarios, it may be beneficial to set up a series of Redis shards within each datacenter and connect all the media repos in that DC to them. This can reduce the amount of time it takes to retrieve media from a media repo in that DC, as well as avoid downloading several copies of remote media.
Note that even when connecting media repos to the same set of shards the repos will still attempt to upload a copy of the media to the datastore. For example, if media repo A downloads something from matrix.org and puts it into the cache, media repo B will first get it from the cache and upload it to its datastore when a user requests the same media. The benefit, however, is that only 1 request to matrix.org happened instead of two.
All media repos should be connected to the same set of shards to ensure even balancing between the
shards. Additionally, all media repos must be running the same major version (anything in
1.x.x) in order to avoid conflicts.
Metrics
The media repo can export metrics for consumption by Prometheus. The metrics listen on a distinct
interface to avoid having metrics exposed publicly, and thus the port cannot be the same port
for the general media repo usage.
The full configuration is:
metrics:
  enabled: false
  bindAddress: "127.0.0.1"
  port: 9000
An example Grafana dashboard is available on GitHub.
Shared secret authentication
Typically used by hosting providers, shared secret authentication can be optionally enabled to make requests as a media repo administrator without needing an account on any of the configured homeservers. Some requests do still require an administrator on a configured homeserver, however most of the Admin API can be used by shared secret users.
The full configuration for shared secret authentication (disabled by default) is:
sharedSecretAuth:
  enabled: false
  token: "PutSomeRandomSecureValueHere"
It is strongly recommended to use a secure random value for token to prevent unauthorized access
to the media repo.
Access token cache
The media repo verifies who is uploading a piece of media by calling the /account/whoami endpoint
on the homeserver over the client-server API. This can cause significant load on the homeserver if
not cached.
The full configuration for the access token cache is:
accessTokens:
  maxCacheTimeSeconds: 0
  useLocalAppserviceConfig: false
  appservices:
    - id: Name_of_appservice_for_your_reference
      asToken: Secret_token_for_appservices_to_use
      senderUserId: "@_example_bridge:yourdomain.com"
      userNamespaces:
        - regex: "@_example_bridge_.+:yourdomain.com"
The access token cache is disabled by default, however if enabled it is strongly recommended to
proxy the /logout and /logout/all endpoints through to the media repo. They'll be proxied through
to the homeserver and update the cache internally. Without this, a smaller maxCacheTimeSeconds is
recommended. If the endpoints are being proxied, a maxCacheTimeSeconds of 43200 (12 hours) will
be suitable for most applications.
To enable the access token cache, set maxCacheTimeSeconds to a non-zero value.
Application services (bridges, normally) can be made even more efficient for the media repo by
registering some minimal information with the media repo. When useLocalAppserviceConfig is true,
the media repo will accept requests which would be valid under the appservices list without
verifying with the homeserver, leading to fewer requests though increasing the risk of media being
uploaded for users which do not exist. It's important to only use this option with a trustworthy
bridge/appservice as otherwise the media repo could become an abuse vector.
Each appservice has an id which is only used for your reference in the logs/API - this can be
set to anything that makes sense to you, such as telegram or discord for the respective bridges.
The asToken should be copied directly from the appservice's registration. The senderUserId is
a combination of the sender_localpart from the registration and the homeserver's domain name. The
media repo only needs to know about the user namespaces, and only the regular expressions contained
within.
Note: If the appservice generated a user namespace for @_example.* (ie: no domain restriction)
then it is important to add one. For example: @_example.+:homeserver.example.org. Without a domain
restriction in the regular expression anyone who matches the prefix could upload media from any
homeserver if they had the right asToken.
Note: If using the appservice feature, it's strongly recommended to only configure the
appservices in per-domain configs to ensure that appservices for one homeserver are not configured
for all homeservers.
Imports, exports, and archiving
TODO: Actually write docs.
Exports
TODO: Actually write docs.
GDPR
TODO: Actually write docs.
Imports
TODO: Actually write docs.
From Synapse
TODO: Actually write docs.
From Export
TODO: Actually write docs.
Quotas
TODO: Actually write docs.
Rate limiting
TODO: Actually write docs.
Quarantine / abuse mitigation
TODO: Actually write docs.
MSC2448: Blurhash
TODO: Actually write docs.